
SQL Server
 https://thelonedba.wordpress.com/2016/04/30/sql-jobs-on-a-calendar
SQL Server backup jobs are IO-intensive, he says, stating the obvious.
When you have a lot of servers which have been set up over the years, and you’re new to the environment, and want to see when storage is being hammered , you might end up thinking that a calendar view might be of help – I know I did.
So all I had to do was figure out a query to look at SQL Server scheduled task history complete with start & end times (which I’d already got), and then get those into a series of appointments in Outlook so I could see when the busy times were.
Step 0: Registered Servers Groups
Step 0? Well, this isn’t directly related to what I’m doing, but helps a lot.
If you don’t know about Registered Servers, then go and find out about them now. I’ll wait. They’re a great way of logically grouping your server estate and allow you can run queries against multiple servers at the same time pulling results back into a single result set.
I’m using them from a Central Management Server; this provides a single shared location that gives the whole team a view of the SQL Server Estate, while removing the overhead of everyone keeping their own lists.
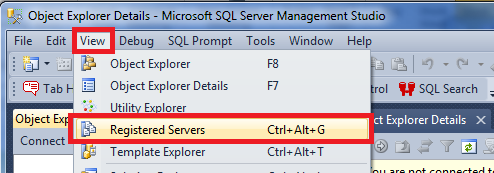
Start working with Registered Servers groups by launching SQL Server Management Studio, and hitting CTRL+ALT+G or selecting “Registered Servers” on the “View” menu.
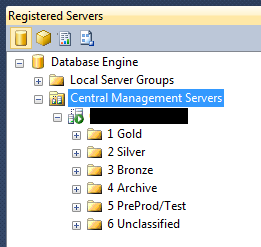
(I’ve blocked out the actual server name).
As you can see, we have six groups of servers defined. What you can’t see is that there are folders within those folders that contain multiple servers, so you can keep more organised lists. More of how this stuff works another time. Maybe.
I’m interested in the top tier “gold standard” servers, so I’ll select “1 Gold”, and click to create a new query. This will take a while – a single query window will open and attempt to connect to all the SQL Servers registered in that group.
Step 1: Query for SQL Job Runtime Information
Of course, this assumes that we’re holding on to SQL Server Agent Job History for a little while – the default job history retention settings might be too aggressive to allow you to get history going back any reasonable length of time.
We need to look at two tables in the MSDB database – sysjobs and sysjobhistory. We only need the job name from the first, and the run information from the second. I’ve already got a CTE defined in my snippets collection in Red Gate’s SQLPrompt that provides me with all this information and a bit more, but I’m feeling lazy (it’s the weekend), so won’t hack out the excess baggage. The JobRuns CTE (given below) gives information about all recorded runs of all jobs; the complexity is in translating the run_date, run_time and run_duration fields from their native format in the msdb.dbo.sysjobhistory table (they’re stored as integers representations of dates and times) to a pair of real datetime fields – RunStartDateTime and RunFinishDateTime. These will come in handy later.
The internal date formats are quite simple – if you remember:
- Dates are integers in yyyymmdd – year, month, day
- Times are integers in ddddhhmmss – days, hours, minutes, seconds
1
2
3
4
5
6
7
8
9
10
11
12
13
14
15
16
17
18
19
20
21
22
23
24
25
26
27
28
29
30
31
32
33
34
35
36
| WITH JobRuns AS ( SELECT j.name , jh.step_id , jh.step_name , jh.run_date , jh.run_time , DATEADD(SECOND, CONVERT(INT, RIGHT('0000000' + CONVERT(VARCHAR(6), jh.run_time), 2)), DATEADD(MINUTE, CONVERT(INT, SUBSTRING(RIGHT('000000' + CONVERT(VARCHAR(6), jh.run_time), 6), 3, 2)), DATEADD(HOUR, CONVERT(INT, LEFT(RIGHT('000000' + CONVERT(VARCHAR(6), jh.run_time), 6), 2)), CONVERT(DATETIME, CONVERT(CHAR(8), jh.run_date))))) AS RunStartDateTime , jh.run_duration , DATEADD(SECOND, CONVERT(INT, RIGHT('000000' + CONVERT(VARCHAR(20), jh.run_duration), 2)), DATEADD(MINUTE, CONVERT(INT, SUBSTRING(RIGHT('000000' + CONVERT(VARCHAR(20), jh.run_duration), 6), 3, 2)), DATEADD(HOUR, CONVERT(INT, LEFT(RIGHT('000000' + CONVERT(VARCHAR(20), jh.run_duration), 6), 2)), DATEADD(DAY, jh.run_duration / 1000000, -- the rest is the start date/time, above DATEADD(SECOND, CONVERT(INT, RIGHT('0' + CONVERT(VARCHAR(6), jh.run_time), 2)), DATEADD(MINUTE, CONVERT(INT, SUBSTRING(RIGHT('000000' + CONVERT(VARCHAR(6), jh.run_time), 6), 3, 2)), DATEADD(HOUR, CONVERT(INT, LEFT(RIGHT('000000' + CONVERT(VARCHAR(6), jh.run_time), 6), 2)), CONVERT(DATETIME, CONVERT(CHAR(8), jh.run_date))))))))) AS RunFinishDateTime , jh.sql_message_id , jh.sql_severity , jh.message , jh.run_status FROM msdb.dbo.sysjobhistory jh LEFT JOIN msdb.dbo.sysjobs j ON j.job_id = jh.job_id ) SELECT @@servername , JobRuns.name , JobRuns.RunStartDateTime , JobRuns.RunFinishDateTime FROM JobRuns WHERE LOWER(JobRuns.name) LIKE '%backup%' AND JobRuns.RunStartDateTime >= '20160101'; |
So, to recap, we have a query that returns Servername, (job) name, RunStartDateTime RunFinishDateTime, for all jobs which have “backup” in the name, and which started some time this year.
That’s potentially going to return a lot of data – in my case, about 140k rows, which (spoiler alert!) causes us with another difficulty later on. First, though, we’ll save this data into something we can use.
Step 2: Saving / exporting data
We have some options here:
- Select all results in SSMS Grid View, and paste into an open spreadsheet
- Use SQL Server Management Studio to save the results into a CSV file, and manipulate that into Excel
Step 3: Massaging the data for import into Outlook
Unfortunately, Outlook isn’t quite intelligent enough to understand what I want to give it based on the data I’ve exported. Oops. So we have to massage the data a little to provide columns named as follows:
- Subject – I use a combination of server name & job name
- Start Date – from the RunStartDateTime column – formula is =Date(Year(D2), Month(D2), Day(D2)) (assuming you’re on Row 2 and the RunStartDateTime is in column D…)
- Start Time – also from RunStartDateTime – formula is =Time(Hour(D2), Minute(D2), Second(D2))
- End Date – from RunFinishDateTime – same formula as for Start Date, but referencing the other field
- End Time – really? I need to complete this thought?
Yes, you could set that up in your SSMS query; no, the caffeine hadn’t hit at the time I was doing this.
Once you’ve filled that lot in down your spreadsheet, then you can filter out the data you actually want to import – importing 140k items at a time could be a bit much! I’ve gone for three filters – I’m only interested in servers whose names indicate they’re in GB, and I’m only interested in jobs that ran in January 2016, and I’m only interested in FULL backup jobs. Yes, that could have been filtered out earlier; no, I didn’t do that because I was also importing other dates and jobs.
Apply the filters, click somewhere in the filtered resultset, then click and highlight those five columns mentioned above. Copy & paste into a fresh spreadsheet. Swear when you see the error saying that the copy area and paste areas are not the same size and shape.

Easy enough to get round – Copy and paste into a fresh worksheet on your original spreadsheet, then do CTRL+A, and copy that into a fresh spreadsheet. Strewth, why does this have to be so complicated? Is it any easier in Office 2013? Please say “yes”.
In that fresh spreadsheet, select the data you want to import, and give it a name. The easiest way of doing that is by just typing in the box I’ve highlighted:

If you don’t set up a Named Range in the excel spreadsheet, then Outlook will complain it can’t find any data to import…
Save your spreadsheet as an Excel 97-2003 .xls file – this version of Outlook can’t cope with .xlsx files. Again, please tell me that later versions can handle more up-to-date file formats? Because there’s a problem with Excel 97-2003 .xls file format, and that is that it can’t cope with more than 64k-1 (65535) rows of data (that’s what the spoiler alert was for). But, hey, at least Microsoft used an unsigned integer for the rowcount, unlike what they did with the score in their first version of Tetris, go on, ask me how I know…
Step 4 – Importing into Outlook
At last!
I’ve created a new Calendar folder in my Inbox for this (after all, I’ll want to share this information with the boss and maybe with the storage guys…)
What’s that? You want to see those steps too? OK. In brief, he says, knowing that the Outlook stuff will take up fully half the post…
Right-click on your inbox, and select “New Folder”


I’m creating this as a subfolder of my Inbox, and naming it “Backup Job Run History”. Type in a name, and Click “OK”.
Then, go to the file menu, click on “Open” and then “Import”

That brings up the Import/Export Wizard, which we’ll quickly rattle through:

That last window picks up on the named range you defined earlier. If you want to add other information, look at the Map Custom Fields bit – we might have been able to do some of this up front, but we’re here now.

When you’re done, click “Finish” and, depending on the amount of data you’re loading, and the speed of your Exchange server, either twiddle your thumbs for a few seconds, or go and get a cup of coffee…

When that’s done, go and have a look at what you’ve created:

Wow. That’s a lot of backup jobs all running at the same time… but at least I can now see where / when they all are.
Now, you’ll want to share this with the boss, so you’ll need to share the calendar with him.


And then, having lit the blue touch-paper, retire to a safe distance.
When the boss decides he likes this, make a recurring appointment in your calendar to keep this up-to-date. I’m still waiting.